DIY: Rustic Chic Canning Jar Vase

20160506_160010

Rustic Chic is in, but sometimes, it’s way too expensive to buy those adorable decorations. This canning jar vase is easy to make, relatively cheap, and you can use to hold a wide variety of things (flowers, both real and fake; brushes; utensils, etc.). It also makes a super simple, but gorgeous gift!

Time: 20 minutes
Total Cost: $15 to $20 (Hobby Lobby often has the materials on sale)
Materials:

  • Wide mouth canning jar
  • Krylon Marbelizing Gold Chiffon Spray Paint
  • Waterproof white craft paint
  • Sponge brush
  • String or ribbon20160506_150615

1. Clean the jar. Let dry.

2. Hold the spray paint over the mouth of the jar. Spray the paint chaotically into the jar so that it appears as if the jar has gold lines dripping down the insides. Let dry.

3. Dab the sponge brush in the white craft paint and paint the inside of the jar using long strokes from the bottom to the rim. Using long strokes will prevent the jar from looking streaky when the paint dries.

4. Once the first layer of white paint dries, you can 20160506_150839optionally add a second layer of white paint to make it a little more opaque. The photos of mine are shown with one coat.

5. Once your paint is dry, tie your string or ribbon around the top of the jar. Fill it with whatever you please.

NOTE: If you don’t use waterproof paint, then don’t fill it with water for flowers. The white paint will scratch off.

DIY: Window Plant Boxes

Okay – you got me. These boxes aren’t just for window sills. In fact, I’m not using them on a window sill at all. These boxes make amazing centerpieces on your patio table, or might be just what you need to line a walkway, balcony or patio.

Since we are renting and I travel for my job a lot, I have been doing quite a bit more container gardening. Even though our landlords said we can do whatever we want to the giant yard, it just made more sense to get these boxes going for some cut-and-come-again lettuce and spinach. (Look for a post on that coming soon!) These are SOOOOO simple and relatively cheap to make.

Time: 45 to 60 minutes per box
Total Cost: About $25 per box
Materials:

  • 1 unfinished cedar board (1x6x8)
  • Nails
  • Slug & Snail Copper Tape
  • Decorative tacks
  • Hammer
  • Drill with 1/3 inch bit
  • Measuring Tape
  • Miter saw (or similar)
  • Garden potting soil
  • Seeds

1. Measure your lumber and cut three boards 20 inches long. These will be your two long sides and your bottom.

2. Nail the bottom to the two sides. (About eight nails) Make sure the rough sides are facing in.

3. Now measure the remaining lumber to cut two end pieces that will be nailed into the bottom and the two sides. These should be approximately 6-3/4 to 7 inches long.

4. Nail one piece to each end to complete the box. (About four nails per end) Again, make sure the rough sides are facing in.

— Up to this point, we’ve left the width of the board alone at 6 inches — Continue reading

Baked Pumpkin (or Homemade Pumpkin Puree)

At work the other day, my boss asked us if we knew where to buy a good pumpkin pie. My simple response: I never buy, I bake. Some of the things I looked forward to the most every year while growing up were the autumn treats my momma made, and autumn wouldn’t be the same if, as an adult, I didn’t also make made-from-scratch desserts. While my absolute favorite fall dessert is my great grandma’s apfelstrudel (apple strudel) made the traditional way where it takes almost all day just to roll out the dough… yummmm. But I digress…this post is about pumpkins.

20151108_103914

A lot of people are either intimidated by making their own pumpkin puree or they think it will be too time consuming, so they buy the overly sugared canned stuff, or they just buy their pumpkin treats at the Kroger bakery. Pumpkins and pumpkin treats don’t have to be intimidating when it comes to the kitchen. Plus, they make everything smell SOOOOO good. Now I can’t guarantee it won’t be time consuming to make pumpkin puree… the tedious part is getting ALL those seeds and pulp strings out of the pumpkins. The smaller your pumpkins, the less time consuming. I do recommend using smaller pumpkins for this, as they fit in your oven better and don’t take as long to bake down.

20151108_075302

FB_IMG_1446991246473Baked Pumpkin & Homemade Puree
Makes about 2.5 cups using 2 pie pumpkins

    1. Just like making a jack-o-lantern, cut the top off your pumpkins. Using a scraper or a spoon, remove as much of the seeds and pulp as you can, and set aside in a colander or toss in the compost. Whatever gets you going. Place the tops back on the pumpkins.
    2. Heat oven to 325*F.
    3. Place pumpkins on a parchment lined baking sheet.
    4. Bake for approximately 45 to 60 minutes, or until a paring knife can be gently inserted through the 20151108_100235pumpkins skin.
    5. Let pumpkins cool slightly for a few minutes, and then peel/remove the skins from the pumpkins either using your fingers or a paring knife. Try to only take the skin and not the pumpkin meat! Don’t forget to cut the meat from the top as well. Discard the skins and the stem.
    6. 20151108_102320Break the pumpkin into smaller pieces and place in a food processor. Puree until smooth.
    7. Store in one to two cup increments in freezer bags. Pumpkin puree can be stored in airtight containers in the freezer for up to a year at the absolute longest, and can be used immediately. (If I don’t freeze what I’ve pureed, I use it for baking the very next day.)

20151108_111214

If you decide to use a large pumpkin instead of two or three pie pumpkins for this recipe, that works too! Your baking time might be a little longer, you’ll definitely have more pulp/seeds to dig out, you’ll easily have more than 2.5 cups of puree, and your puree’s flavor/texture might be a little different than the smaller pumpkins.

Every type of pumpkin will have a different flavor and/or texture. For instance, I’ve found that Cinderella Pumpkins are a little on the sweeter side, and make a slightly juicier puree. The juicier the puree, the more likely it is you’ll need to strain it with cheese cloth or a fine mesh strainer. Puree should always be a thick yet creamy texture to meet the consistency needs of your baked goods.

Chunky Tomato Salsa

My favorite thing to can is salsa. I can’t get enough of the delicious smell as it wafts from the kitchen and into the rest of the house. And I’m all about being steadily employed in the kitchen. Yes, there can be a lot of wait time when you’re boiling down your tomatoes, but there are also more vegetables and herbs that need to be prepared as well.

There’s a lot more love and a lot more room for creativity in salsa. Do you like it spicy, or do you like it sweet? Do you want it chunky or smooth? Do you have a lot of tomatoes or a lot of corn? Do you have other veggies you want to try in it, such as zucchini? You can give salsa as a great thank you gift, or part of a gift basket, or you can keep it all to yourself, or serve it at parties. (TIP: You can also pack it up and send it over in a care package to those deployed guys. If you package it right, you can get a bag of chips and a jar safely through military mail.) However you choose to make it or use it, it’s great to know you have some jars on hand.

20150813_181021

This particular recipe is a favorite in the Blue Shoes household. Although I may have made this last batch a tad too spicy for my hubby… we will see what he thinks when he gets home. It does take a bit of time for the boiling down so make sure you have cleared out at least a full evening or half of a weekend day for whipping up this tasty treat.

20150810_185857Chunky Tomato Salsa
Makes 4-5 regular mouth pints or 3-4 wide mouth pints

Ingredients

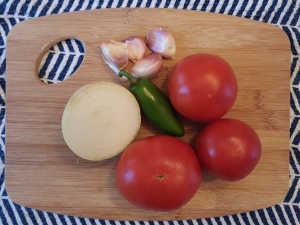
  • 8 lbs ripe red tomatoes
  • 2 cups yellow onions, chopped
  • 1/2 cup fresh cilantro, snipped
  • 1/2 cup lime juice
  • 1/2 cup distilled white vinegar
  • 1/3 cup tomato paste
  • 5 garlic cloves, minced
  • 2 cups seeded and chopped fresh chile peppers (or use whatever kinds of peppers you like, and keep seeds in or out for varying levels of heat)
  • 1 1/2 tsp salt
  • 1/2 tsp ground cumin
  • 1 tsp coarsely ground black pepper
  1. 20150810_190112
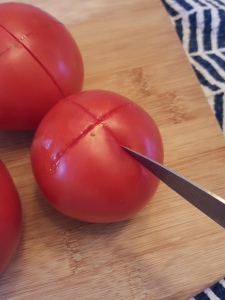
Peel tomatoes. The best way to peel tomatoes is to bring a pot of water to boil. Lightly slice an x shape on the bottom of each tomato, just enough to crack the skin. Place tomatoes in the boiling water for about 30 seconds or until skin is peeling away (time may be slightly less or slightly more depending on the size and ripeness of your tomatoes). Scoop them out of the water using a handheld mesh strainer. Don’t use tongs as too much pressure may burst the hot tomato.
  2. Seed, core, and coarsely chop tomatoes. (This part is really messy so don’t even bother trying to keep it clean.) Place chopped tomatoes in a large colander; set aside and let drain for 30 minutes.
  3. 20150810_220700Transfer drained tomatoes to an 8- or 10-quart stainless steel or nonstick heavy pot. Bring to boiling; reduce heat. Boil gently, uncovered, for 1 to 1 1/2 hours or until thickened, stirring occasionally.
  4. Stir in onions, cilantro, lime juice, vinegar, tomato paste, garlic, peppers, salt, cumin, and black pepper. Return mixture to boiling; reduce heat. Simmer, uncovered, for 10 minutes.
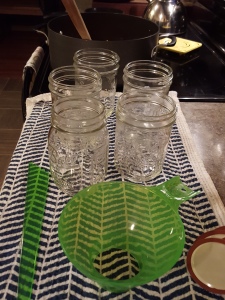
  5. Ladle hot salsa into hot sterilized pint jars. Leave a 1/2 inch headspace. Wipe jar rims; adjust lids and screw bands.
  6. Process filled jars in a boiling-water canner for 15 minutes (timing starts when water returns to boiling). 20150810_222025Remove jars from canner and cool on wire racks with one inch of space in between jars for at least 12 hours.

A properly sealed jar of salsa has a long shelf life, and the heat/flavors of the ingredients will get stronger over time. Serve with corn tortilla chips. Yum!

EXTRA #1: Try mixing up the texture by using heirloom tomatoes instead of regular red vine tomatoes.

EXTRA #2: Roast your garlic and make it extra garlic-y (slice off the top third of a garlic head, place the bottom half on a piece of tin foil and drizzle with olive oil, salt and paper, replace the top third, seal the tin foil and roast at 400*F for 30 minutes. Mash it with a fork.)

20150813_180838

Where does the time go & what’s coming soon

I have been ABSOLUTELY awful about posting lately. Time has gotten away from me. Between the hubby being gone and trying to get the house ready to sell/PCS, I’ve barely had time to keep up with the garden, let alone blog about it! So I apologize to my lovely readers for my lack of posting.

11868599_10207015351403507_785107831_nThings always seem to go “wrong” when the hubby is gone… as in weird things break, or hard to reach lights go out. (Seriously, last year while he was at JRTC I had FOUR lights go out in one day!) So amidst all my DIY projects for the house, I’m also fixing random things, such as the oven light, or the fact that my ceiling fan and light fixture in the master bedroom fell—it literally fell—out of the ceiling and was hanging by the wires. That was a pleasant Saturday night treat… :/ So I now know how to replace a mounting bracket on a ceiling fan and which wires connect to which.

I’ve also been working on booking that oh-so-sweet post-deployment vacation! Caribbean Cruise, here we come. I’m so excited; neither of us have been on a cruise and it will be around our anniversary as well. Yay!

In garden related news. I did manage to get in some harvesting last week, but my okra was about four inches longer than it is supposed to be (you should be picking your okra at three inches…), and the plants are really going nuts (super tall and full of pods). So we will have plenty for stews, gumbo, and frying. I also made my favorite thing to can—chunky tomato salsa. I promise the recipe will be up this week!

I’ve been thinking a lot about what kinds of things I will need to transplant to containers for our next move. Now that we are leaving this station, I’ll need to get my garden herbs ready for container gardening while they can still be outside… mint, bee balm, chives. Plus, I’ll need to dry out some seeds from the peppers, beans, and fennel for next year. So much to plan for, but you can expect to see some transplanting tips soon!